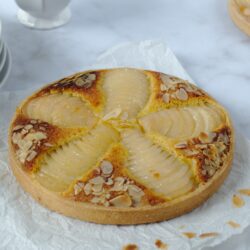
Tarte Bourdaloue
Classic French tart, complete with almond cream, poached pears & topped with toasted almonds.
Print
Pin
Servings: 6 people
Equipment
- Tarte Circle
- Sheet Pan
Ingredients
Tart Dough
- 175 g All-purpose flour Type 45
- 90 g Butter
- 20 g Egg Yolk
- 20 g Milk
- 20 g Granulated sugar
- 3 g Salt
Almond Cream
- 65 g Almond Powder
- 65 g Butter
- 35 g Granulated Sugar
- 50 g Egg
- 5 g All-purpose flour, (type 45)
- 5 g White Rum optional
Finishings
- 4 Large Poached Pear Halves, (canned is fine)
- 25 g Slivered Almonds
- Neutral Glaze
- Powdered Sugar
- ½ Vanilla Bean, (split and degrained)
Instructions
Tart Crust
- Cut the butter into the flour until it resembles sand. You can do this by hand with a pastry cutter or even your fingers. If using a stand mixer, use the paddle and mix on low.
- Add the beaten egg and milk, sugar and salt, mixing until the dough pulls together, but be sure not to over mix the mixture.
- Dump the mixture onto a clean work space (not floured) and push the dough away from yourself with the palm of your hand. Repeat this 3-4 times, then pull the dough together with a bench scraper and roll into a ball.
In the pastry world, this action is called "frasier" and is meant to create a homogeneous dough without overworking it. The more you overwork the dough, the more elastic it becomes, meaning your tart shells will shrink more during cooking. - Flatten the dough into a disk, then wrap and let the dough rest in the fridge for a minimum of 30 minutes.
- Meanwhile, butter and flour the tart circle and transfer it to a cookie sheet covered with parchment paper or silicone mat. I prefer parchment paper but either one gets the job done.
- Lightly flour your work space and roll out the dough to a thickness of about 4mm. Alternatively, you can roll out the dough between two sheets of parchment paper. If you find that the dough is warming up too much, just pop it into the fridge for 15 minutes or so. I find it easier to work with chilled dough when lining my tart rings.
- Trim the dough to the desired size. Personally, I place my tart ring on top of the dough, then trim, leaving an excess of about two fingers widths around the pan. Leaving too much excess dough makes it a lot harder to work with.
- Line the tart ring, working the dough into the corners of the ring. The goal is to make 90° angles. Using a paring knife, trim the excess dough from the top of the tart ring, cutting away from yourself. Make sure that the knife is flush with the top of your tart pan, so the top edge of your shell will be even. Transfer to the fridge to chill until needed.
Almond Cream
- In a stand mixer, cream the butter and sugar together until light and fluffy.
- Add the powdered almonds and flour then mix until the mixture homogeneous, but do not over whip it. If you over aerate the mixture, the more it expands during cooking. Trust me, I have had more than a few overflowing tarts because I was multi-tasking and left the mixer on.
- Add in the vanilla grains and rum and mix once again until it's combined. You can omit the rum if desired, but I find it gives the almond cream a little extra flavoring.
Assembly
- Preheat the oven to 180°C (350°F).
- Spread the almond cream evenly on the bottom of the tart shell. I prefer to use an offset spatula as it gives you a bit more control, but a spoon works just fine.
- Drain the canned pears and slice them evenly in a horizontal manner. You can also poach fresh pears and they work just as well, but I find canned pears have a stronger pear flavor. Slightly flatten the pear halves, to lengthen them a bit all in the same direction.
- Using an offset spatula, transfer the pears to the tart shell, placing them on top of the pastry cream at 3, 6, 9, & 12 o'clock.
- Sprinkle slivered almonds on top of the pastry cream that is peaking out between the pears.
- Bake the tart for 45 minutes. Transfer to a cooling rack let sit for at least half an hour.
- Once the tart is cooled, brush the top of the pears with neutral glaze, then dust the slivered almonds with powdered I sugar. I place my hand over the pears, to keep powdered sugar off of them.
Tried this recipe?Mention @mysecretconfections or tag #mysecretconfections!